Learn about the basic details of braided ropes and appreciate this unique and beautiful craft.

“I don’t know what rope I use. A rope is a rope, right?”. To those of us who spend every day thinking of ways to make climbing ropes safer, lighter, more sustainable, more durable, or more affordable - or how to achieve a combination of these improvements by understanding, reviewing, and tweaking the tiniest details in the production process, a statement like this is like a kick in the nuts. Join us in this series of articles to get enlightened, learn about the differences with regard to what is probably one of the most important pieces of gear you own, and appreciate the wonderful craft of braiding.


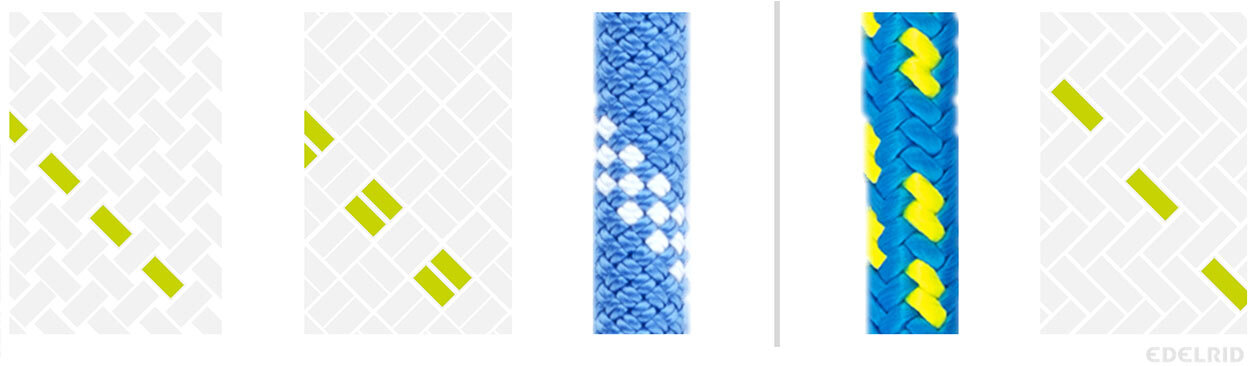
Let me start by getting something off my chest: Ropes are braided not woven!

I realize that this is a minor detail, but if you want to truly dive into the world of ropes and not disqualify yourself in some nerd talk, you need to get this straight. Every time I hear someone use the term “weave” in the context of ropes, I get a nervous twitch. It is somewhat understandable, perhaps. The difference may seem small but actually involves two completely different machines and processes. So, in brief: braiding is the regular interlacing of several strands of flexible material. The main differences to weaving are that in braiding the threads are not fed at zero or right angles to the main production direction and you have a single coherent thread system as opposed to several independent ones as in weaving.

Braiding and weaving: a small but major difference.


Different braiding machines - different sheaths

The first decision when braiding a rope is to choose which machine to use. Today, there is a huge variety of braiding machines: from circular braiders through square braiders to high-end Cartesian braiding machines able to braid three-dimensional objects. As the standard dynamic and static ropes are braided as round braids on circular braiding machines, we will of course concentrate on these machines. These primarily differ with regard to the number of bobbins in the braiding circle and the size of the bobbins.

Circular braids are always made with two bobbin groups, thus resulting in an even number of bobbins every time. Both groups circulate on two separate phase-shifted tracks on the machine. One bobbin group always moves in a clockwise direction, the other counterclockwise. The structurally smallest round braid can therefore be made with four threads. Static and dynamic ropes are primarily made using 16, 24, 32, 36, 40, and 48-carrier machines. The higher the number of bobbins on a braiding machine, the finer the sheath that is braided.

The other decisive variable is the bobbin size. The bigger the bobbin, the more yarn fits on it. This can either relate to the total length of yarn, leading to bigger batch sizes, or the yarn thickness, leading to a thicker rope sheath. The trade-off in the case of machines with bigger bobbin sizes is usually that these machines are slower and therefore have a lower output rate.

To be clear: none of the machines are better or worse than the others. Choosing the perfect machine always depends on what rope you want to braid for which purpose. Just as you have different screwdrivers for different screws depending on the workpiece at hand.

A 40-carrier with medium bobbins and a 16-carrier with large bobbins.


Yarn preparation: parallel, twisted, or parallel-twisted

Next, let’s take a closer look at the yarns themselves. Once spooled on the bobbins of the braiding machine, there are two basic options for preparing them depending on the characteristics we want to support in a rope. The yarn can be twisted or it can be used untwisted, grouped together in parallel.

A twisted yarn (also doubled or plied yarn) can be either twisted in itself or comprise several yarns twisted together to form a thicker yarn. This is also one of the reasons twisted yarns get used, to simply create a rope with thicker yarns than what may be available at the raw material stage. This can be for reasons such as increasing the sheath proportion or just having enough sheath material to cover the core. Another advantage of twisted yarns is their increased abrasion resistance in comparison to parallel grouped yarns. This is because if a physical abrasive element is applied to the braid from one side, the twisted design always ensures that inner fibers are not directly affected by this. A possible adverse effect of twisted yarns is that their strength decreases while their static elongation increases in proportion to the number of twists per meter of yarn.

With parallel grouped yarns we get the opposite effects: the strength increases and the static elongation decreases due to the ideal alignment of all the yarn’s filaments. The abrasion resistance, on the other hand, is impaired for the reasons mentioned above.

Finally, it is also possible to braid a rope combining the two above-mentioned options. Several twisted yarns can be grouped in parallel on the same bobbin. The resulting rope characteristics will then be somewhat of a compromise between all of the effects explained above.

Look closely: twisted yarns, parallel grouped yarns, and twisted-parallel-grouped yarns in three different rope sheaths


Braiding patterns: plain or twill braid

Now that we have chosen a machine and a preparation for the yarn, the next decision is about the braiding pattern. Again, if you look at different braids of ropes and cords you have at home, you will be able to distinguish between two basic braiding patterns as well as many sub-variants. There are two basic braiding patterns on circular braiding machines: plain braids and twill braids.

The difference is all in the way the yarns in one direction pass under and over the other yarns. This becomes clearer when we try to follow one of the yarns in the braid that we are looking at. In a plain braid, a given number of yarns of one braiding track always passes over and under exactly the same number of yarns on the opposite braiding track (e.g. 1 over 1, 2 over 2). In contrast, in a twill braid, a given number of yarns of one braiding track passes over and under more than the same number of yarns of the opposite braiding track (e.g. 1 over 2).

Plain braid 1 over 1 and 2 over 2 | Twill braid 1 over 2

As always, different characteristics come with the different patterns. Twill braids result in a very smooth surface. In theory, smooth surfaces are more resistant to abrasion as the smoothness reduces friction between the rope and other objects. However, being smooth on the outside also means being smooth on the inside. This can have a particularly unfavorable effect on the rope’s tendency for sheath slippage. So, all factors considered, a rope with a twill braid will have more sheath slippage during use. When using very thick yarns however, the twill braid is often the best choice as a thicker yarn already naturally results in a rougher surface.

A slick sheath is not always a good thing though. Sometimes, we need a good grip for our hands or certain devices. The plain braid has exactly this effect. In general, a plain braid is the more forgiving construction, causing the fewest potential problems in practice, such as frying up sheaths or twisted ropes. This especially applies when braiding thin yarns.

Now that we are familiar with the basics of braiding, let’s take a closer look at the components of a rope.


The sheath – starting with the obvious

If we define innovation not by the exaggerated and oppressive marketing meaning seen every day but by its actual root meaning of a new dominant design or principle that fundamentally changes and/or advances whole industries or ways of doing things, we have to admit that in the evolution of climbing gear there have only been a few of such events. However, EDELRID’s invention of the principle of braiding a rope with a sheath covering the load-bearing core in 1953 was certainly one of these. It meant a huge advancement for climbing and, of course, the use of ropes in general as now the crucial core (formerly also called the soul) was protected from physical abrasion and sunlight, resulting in significantly greater safety as well as opening up many more future constructional opportunities for ropes.

Over 160 years of ropemaking history


The core

The core or soul of the rope can take many forms. Virtually any elongated object can be inserted into the center of a braiding machine and therefore be equipped with a braided sheath around. For dynamic and static ropes, these are often “core strands”, a separate braid, several braids, or any combination of these. The term “strand” is used when yarns have been twisted in a multi-stage process. For example, when yarns that have been twisted at least once are twisted again. With a braided core, on the other hand, all the possible settings mentioned above once again come into play to create the desired core braid properties.

The reasons for choosing one core or the other are, as always, many and varied. A braided core, for example, can typically get a higher strength out of a certain rope construction when we talk about sewn end terminations. Another upside is that a rope with a braided core does not tend to flatten out over time when subjected to heavy use as such a core has a given three-dimensional textile structure that can always be re-established. It is also one of the favored construction characteristics for splicing. On the other hand, it is evidently more time-consuming to produce as it requires two braiding processes in a row. Core strands are obviously easier to produce and the favored construction, especially for dynamic ropes. If the objective is also to maximize the maximum tensile strength of a given rope and/or to minimize static elongation, this option is also the better choice.

Different cores, different pros and cons


Creating a rope's character

Apart from the above-mentioned basics of rope construction, there are many, many more variables in each production process (that we have not even talked about in this article) when it comes to creating the rope’s final character. For example, a very noticeable property is the often discussed subtleness of the rope. Rope manufacturers, however, make a more precise distinction between bending stability and compression stability. The final perceived result depends on the interaction of both properties, which can be adjusted in more detailed machine settings.

There are plenty more things that we could talk about. However, all settings, process designs, and constructive features pursue one ultimate goal: the optimum alignment of the two elements, core and sheath. To perfectly match two usually unconnected textile components that so often differ with regard to shrinkage, elongation, material, or friction, that is the real crux of kernmantle rope braiding.


One plus one never equals two

It is important to understand that braiding is not as simple as it might seem having read to this point. As often in life, there are many solutions for tackling the same challenge. You should not consider any of the techniques described here and the resulting effects (whether good or bad) in isolation. For example, to make a rope more abrasion resistant, you can reduce the friction of the sheath, but you can also increase the sheath proportion. Two (of many potential) solutions that may require different constructions. Each solution has its disadvantages. In the end, it comes down to what generates the most benefits for the use of the rope on a net basis. There is no such thing as THE best rope. There is only ever the best rope for the situation at hand.

Braids can not only save lives; if you look very closely, you will also discover they have a life of their own. 

Learn about your rope’s technical data, what it means and what’s behind it.

“I would like to file a complaint: I weighed my rope and divided it by the stated length and it is not what you say it is!”, “My rope says eight falls but I have already fallen seven times—do I have to retire it after my next fall?”, “I have measured the diameter of my rope with a caliper and it is thicker than indicated.”, “The rope is said to be for top-roping. Can I also lead climb on it?”. E-mails like this reach us, and worse me, every few days. Let’s take a look at the technical data that characterize a rope, whether static or dynamic, and find out what it really means.


Who actually makes the statistical claims?

Perhaps the most important thing to understand in this regard is that unlike the weight of a harness, for example, a manufacturer has to rely on the results obtained during tests by an external authorized institute and cannot simply present the technical data that he measures by himself! In the article PPE Basics, you will learn that a climbing rope, whether dynamic or static, is classed as category 3 personal protective equipment. This means that the product must be technically tested and its production monitored by an external authorized institute. In the article, you can also learn that these tests are based on certain standards that define the testing procedures and find out which data a manufacturer needs to supply with the product.


Different ropes - different data

So, what does a manufacturer need to put on a rope? This firstly depends on the type of rope. Static ropes are tested according to EN 1891, dynamic ropes according to EN 892, and (to cover all bases) accessory cords according to EN 564. The table below presents an overview of which technical (statistical) data needs to be supplied with which rope types (please note that far more information also needs to be supplied):

The statistical data needed to be supplied by a manufacturer depending on the type of rope


What is important to know now is that, according to the different standards, seemingly similar sounding measurements are determined in different standardized test setups. For example: due to the different rope categories, the diameter or weight stated might not be measured using exactly the same procedure. This may already provide an initial indication of why you should trust the data provided by the manufacturer rather than measuring it yourself at your kitchen table. But let’s go a little more into the details…


A ropes’s diameter

One of the most obvious pieces of statistical data about a rope - and maybe the first thing at hand to roughly differentiate between ropes within the same category - is its diameter. However, measuring this is not as easy as just putting your caliper gauge on your rope. As textiles are flexible, stretch under load, and always behave slightly differently from batch to batch, we need to maintain a standardized procedure when performing measurements to ensure tests are both reliable and reproducible. A test’s reliability refers to how consistently it measures a characteristic. A high reliability means, for example, that if the same person were to repeat the same test, they would get the same or a similar result. Reproducibility, on the other hand, refers to how consistent the results of a given test are when conducted repeatedly. In other words, a high reproducibility means that different people conducting the same test would get the same or a similar result.

Since textiles are by nature so difficult to measure and calculate, additional pre-treatments and pre-processes are often defined to force better comparability and/or exclude differences caused by the environmental conditions. For ropes, the basic principle for many measurements is often the same: the rope is loaded with a certain weight for a certain time, multiple measures are taken at different points within a defined time frame, and the average is calculated.

We will not go into full detail for the other statistics addressed in this article, but for the diameter let’s look at the differences within the three standards to get an idea of how differently the diameter is determined. 

Differences in the methods for measuring basically the same thing – the diameter

A ropes’s weight

The same principle applies here. The result is supposed to be the weight per meter. In order to measure this, we need to define how long a meter really is. Just like for the diameter, the rope gets loaded with a certain weight, depending on the type of the rope, for a defined time. The meter is then measured, cut and weighed...

But to return to the aforementioned frequent customer complaint of “I weighed my rope and divided it by the stated length and it is not what you say it is”, the fact that the weight was measured in a laboratory under specially defined conditions is not actually the only reason behind the inaccurate kitchen table result. Rope manufacturers often put more meters in the package then officially stated. So, when you buy a 60-meter EDELRID rope, for example, what you will actually get is about 62 meters of that rope. What a bargain, hey! We and other manufacturers are actually doing this to be on the absolute safe side when it comes down to the situations where a user plans to use every single one of the 60 meters, for example for a rappel. It also compensates for further shrinking of the material when initially used.


The number of falls

To cut to the chase: no, you do not need to worry about how many whippers your rope can take. You need to regularly inspect your rope for damage both visually and by feel, but the number of falls provided in the rope’s technical data is certainly nothing to be concerned about. These falls are performed under very tough and practically untypical static conditions at very short time intervals. This should guarantee a comfortable safety margin and provide a way to clearly differentiate between dynamic ropes. However, it has little practical relevance otherwise.

A certain mass (again depending on the type of the rope) is dropped a total length of 4.8 meters and statically caught by 2.8 meters of rope, creating a fall factor of roughly 1.7. As a comparison: fall factors in typical lead climbing scenarios range from 0.1 to 0.9.

Interestingly enough, even static ropes according to EN 1891 have to pass a dynamic test. The requirements are much lower though and the results do not have to be published with the product.

Does lower impact force equal a softer catch?

Another metric that regularly gives rise to the discussion is the impact force specified for dynamic ropes. This is measured for the first dynamic fall for which the rope is tested and indicates the energy required to catch the weight. So, the theory goes, the lower this value, the softer the catch feels for the climber later on in practice. But is this really the case? Alternatively, one could also argue that a rope with a higher impact force in a real fall scenario can transfer the resulting force more directly to the belayer, who would/could automatically belay more dynamically as a result. A research project and related article about this issue will follow soon. Until then, I would contend that most of the differences here are so minor that they would not be reliably detected in a blind test.


What is it all good for?

That leaves the question: what is the point of all this information if it is often so far removed from any practical application? Of course, there are characteristics such as length, weight, or diameter that help users to choose the best rope for their project or equipment but most of the other measurements are admittedly solely used to clearly classify ropes as dynamic ropes, static ropes, or accessory cords, as well as to guarantee a comfortable safety margin. Both of these aspects are important, but to this day there is still no reliable way to clearly classify ropes based on their safety level. There is a popular consensus and clear statistical evidence that the most common cause of rope failure by far is sharp edges - and none of the stated characteristics allow users to draw any reliable conclusions about the true cut resistance of ropes. There might be a solution to this though. You can check it out in our article about the cut resistance of ropes: